Body Casting: The Essential Guide to Creating Realistic Body Casts
Body casting, often referred to as life casting, is the artistic and technical practice of creating a detailed external impression of the human body or parts of it. From portraiture to museum displays, film props to anatomical study models, body casting offers a way to preserve the unique form of a person in a durable, tangible object. The process blends sculpture, molds, texture, and color to achieve a sense of realism that can range from highly precise to artistically interpretive. In this guide, you’ll find practical guidance, terminology, safety considerations, and step-by-step workflows for both partial casts (such as hands, face, or feet) and full-body casts, along with tips for finishing and display.
Before diving into how to do a cast, it helps to understand the core concepts that recur across projects. The language of body casting can be technical, but the ideas are straightforward once you know them:
Negative mold: A hollow shell that captures the negative space of the body part. This is what you create first, typically from a skin-safe impression material.
Positive cast: The final sculpture you remove from the negative mold. It represents the real-world form in three dimensions.
Impression material: Substances that contact the skin to capture detail. Common options include alginate (a seaweed-based, skin-safe material) and silicone elastomers used for more durable, lifelike results.
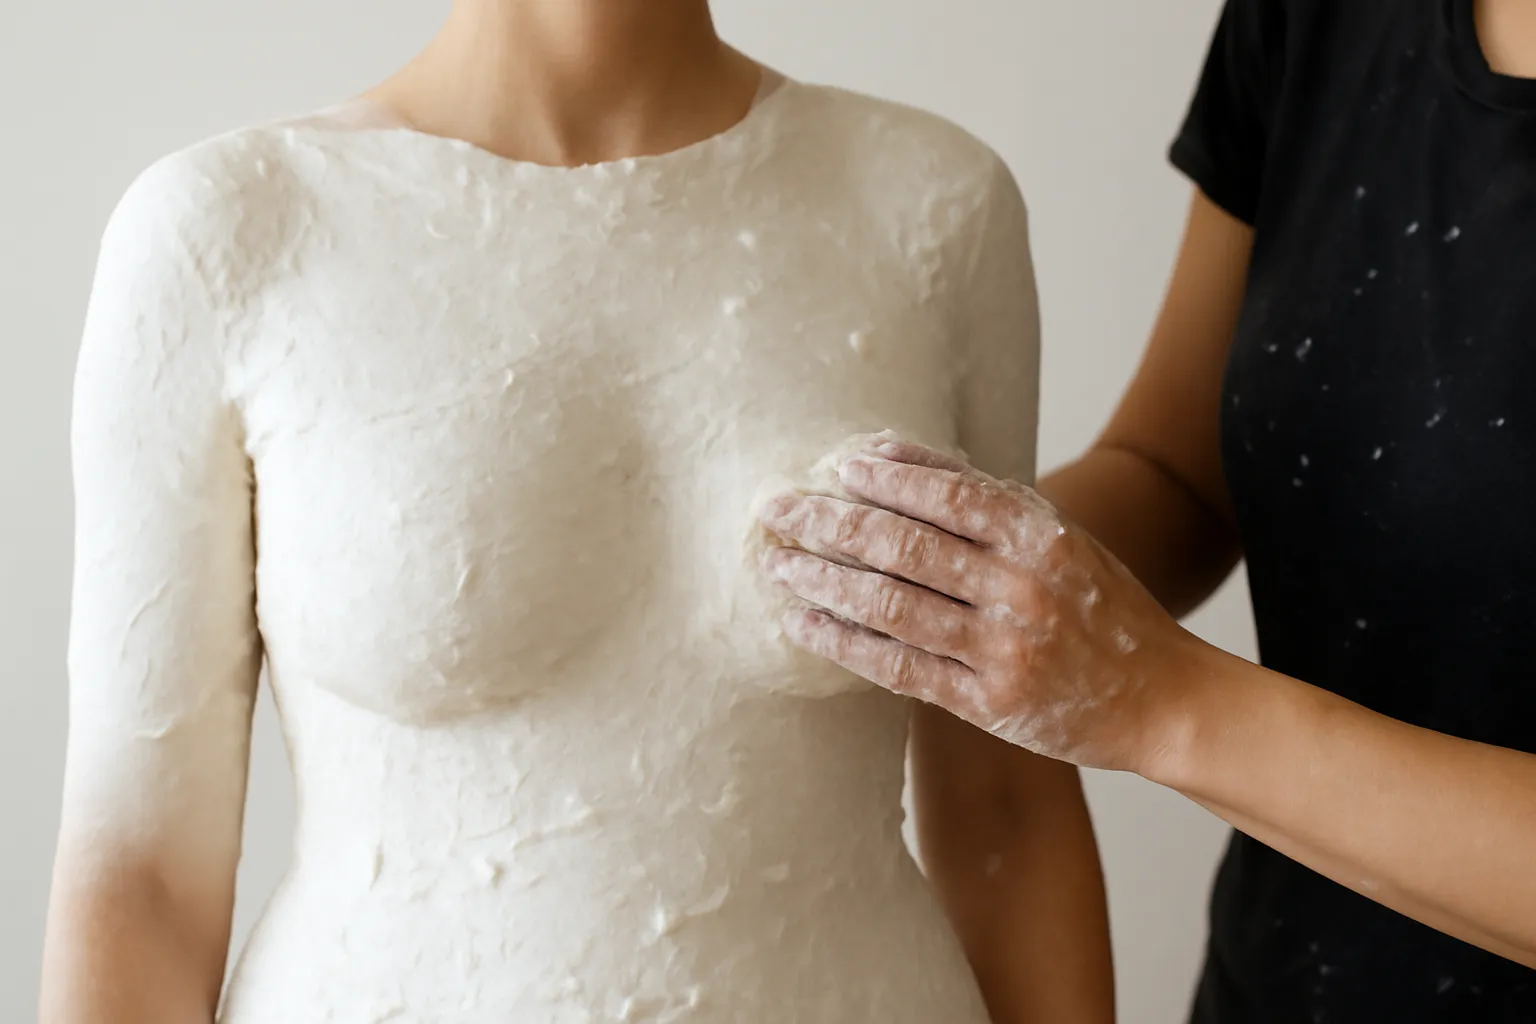
Shell or rigid support: A hard outer layer that gives the flexible impression material shape and strength. This is typically made with plaster bandages or fiberglass/resin systems.
Release agents: Substances applied to the skin or to the mold to prevent sticking and facilitate removal.
Texture and finish: The visible surface details, including skin texture, pores, hair, and color, that determine how realistic the final piece looks.
Ethics and consent: A critical element of any body casting project. The model must understand what will be done, how the cast will be used, and rights to the finished piece.
Planning and consent: the ethical foundation
Consent, privacy, and rights
Because body casting involves a direct imprint of a person’s body, you should begin with explicit consent. A model release form documents permission for creating the mold and final cast, and for any use in exhibitions, publications, or sales. If the subject is a minor, ensure a parent or guardian provides consent, and that all terms consider the minor’s safety and well-being. Clear communication about the scope, duration, and location of the work helps prevent misunderstandings and protects both artist and model.
Safety and comfort considerations
Body casting should be conducted with attention to comfort, breathing room, and skin safety. Some practical steps include:
Conduct a preliminary survey of any allergies (especially to alginate, latex, silicone, or other materials).
Keep sessions short, with breaks to prevent overheating or claustrophobia, especially for full-body casts.
Provide a chaperone or assistant to help with application and removal, and to monitor the model’s well-being.
Ventilate the workspace when using solvent-based release agents or resins.
Have clean water, towels, and a plan for rapid removal if the subject experiences discomfort.
Partial casts vs full-body casts: choosing the right approach
There are several practical paths in body casting. The distance between a quick, high-detail result and a full-life-size sculpture often depends on the scope of the project, the subject’s comfort, and the intended display context.
Partial casts (hands, face, feet)
Partial casts are by far the most common entry point for beginners. They require less time, less space, and milder risk of distress. Typical partials include:
Hand casts (individual fingers or full hand)
Face casts (masks or busts, often focusing on the nose, cheeks, and jawline)
Foot casts (soles, arches, or entire feet)
Ear casts (for jewelry, prosthetics, or anatomical study)
Full-body casts
Full-body casts offer a complete sculpture of the human form, but they demand more planning and support. Approaches include:
Segmental full-body casts: Casting the body in sections (e.g., head-and-torso, limbs) that are later joined in a final composition.
Portable life-cast booths: A dedicated space that allows safe, stable application and removal and often includes a system to help the model sit or lie as needed.
Studio or clinical setups: More controlled environments with professional-grade supports, resins, and finishing equipment.
Materials and safety: what you need to know
Choosing the right materials affects detail, safety, and ease of removal. Below is a practical overview of common choices, why they’re used, and what to watch out for.
Impression materials
Alginate: A biocompatible, water-based impression material that captures fine details quickly. It is ideal for tight tolerances but is typically not reusable and can shrink slightly as it dries.
Silicone elastomers (often used for the negative mold of more sensitive or long-use projects): Durable, highly detailed, and pigmented to match skin tones. Requires a release agent and careful mixing.
Combination methods: Some artists begin with alginate for a fast capture and then encase it in a silicone or plaster shell to create a robust negative mold.
Shell materials: turning a flexible impression into a rigid piece
Plaster bandages or plaster cloth: Inexpensive and easy to apply, forming a robust exterior shell around the impression to support the final cast.
Fiberglass or resin shells: Provide a lighter, stronger, and smoother exterior but require careful handling and appropriate ventilation.
Casting materials: turning a mold into a final sculpture
Plaster of Paris: Good for quick, affordable solid casts, but relatively brittle and heavy in full-body configurations.
Resins (polyurethane, epoxy) and cast silicones: Produce highly durable, realistic results with skin-like texture and color flexibility, but require more precise mixing and curing conditions.
Gel coats and paints: Used to finish and color castings, with silicone pigments or paint systems designed to match skin tones.
Release agents and safety gear
Petroleum jelly or specialized skin-safe release agents help prevent sticking to skin or to the mold.
Gloves, goggles, and appropriate ventilation for resin work.
Cleaning supplies, towels, and a clear workspace plan to minimize accidents.
A practical, step-by-step workflow for partial casts
Overview of the process
Partial casts, such as a hand or face cast, are a reliable way to learn the fundamentals. The workflow typically follows these stages: planning and safety, preparing the subject, creating the negative mold, removing the mold, casting the positive piece, and finishing.
Tools and materials checklist for partial casts
Impression material: alginate or silicone
Shell material: plaster bandages or fiberglass shell
Release agent: petroleum jelly or specialized spray
Finishing: sandpaper, sculpting tools, brushes, silicone pigments or paints
Safety items: gloves, masks, eyewear, a comfortable chair or table for the model
Step-by-step: face or hand casting
Consult and consent: Confirm permission and discuss the intended use of the cast.
Prep the subject: Have the model remove jewelry, clean the skin, and tie back hair or cover it safely if needed. Apply a light skin-safe barrier around hairline to protect it from materials.
Prepare the mold container: Build or prepare a mold box or container that can hold the body part with adequate clearance for the material to flow and capture detail.
Apply release and begin the impression: Coat the skin with release agent. Mix alginate (or silicone) according to the product instructions and apply evenly, focusing on capturing fine lines and pores.
Allow the impression to set: Follow the manufacturer’s cure time. Keep the subject still and comfortable during this phase.
Remove the negative mold: Carefully detach the mold from the skin, ensuring you preserve the details and avoid tearing delicate areas.
Build a rigid shell: Cover the negative mold with plaster bandages or a fiberglass shell to create a solid form that can withstand casting material removal and handling.
Remove the negative mold from the shell: Once the shell sets, gently extract the negative mold from the shell, leaving the rigid framework intact.
Cast the positive: Pour plaster, resin, or silicone into the negative mold to create the final cast. Allow it to cure fully before demolding.
Finish and color: Remove rough edges with sandpaper, apply surface texture, and paint with skin-tone pigments to enhance realism. Seal the surface to protect the finish.
Display or store: Mount the finished piece on a base or in a display case suitable for the environment where it will be shown.
Step-by-step workflow for full-body casts
Overview and safety considerations
Full-body casts require careful planning, ample space, and additional safety measures. The goal is to capture accurate proportions while keeping the subject safe and comfortable. Many artists opt to cast in stages (segments) to reduce stress and error. If you are new to body casting, start with partials, then progress to more complex projects as you gain confidence.
Plan and prepare
Decide whether you will pursue a segment-by-segment approach or a two-part full-body process.
Prepare the space with ample room, good lighting, ventilation, and a comfortable surface for the model to lie down or sit.
Assemble a crew or assistant team to help with application, monitoring, and safe removal.
Common full-body workflows
Segmental casting: Cast the torso, arms, legs, and head in separate sections. Each section is an individual mold and cast, later assembled into a complete sculpture.
Full-coverage alginate bath with an outer shell: In some studio setups, the model is partially embedded in a large alginate bath within a supportive frame, then covered with a rigid shell for removal and casting.
Hybrid approaches: Some artists start with alginate for quick capture and supplement with silicone segments to reduce weight and improve durability.
Tracking proportions and alignment
When working with full-body casts, maintaining correct proportions and alignment is critical. Use reference points (shoulder width, hip alignment, knee-to-ankle proportions) and label each section clearly. A well-documented workflow helps you reassemble pieces accurately and ensures the final sculpture has natural posture and balance.
Finishing a life cast: texture, color, and realism
After casting, the finishing stage is where the work becomes truly lifelike or stylistically expressive. Several techniques help you achieve realism or a specific aesthetic.
Texture and detail
Realistic skin texture includes pores, fine lines, and subtle irregularities. Techniques to enhance texture include:
Recreating hair and eyebrows with fine silicone strands or specialty fibers.
Adding surface texture with sponges and stippling tools to simulate skin pores, freckles, or scars.
Using a release agent on the mold surface to retain fine detail in the cast.
Color and tone
Color is a critical factor in achieving realism. Consider these approaches:
Silicone pigments mixed into the silicone casting material for a seamless color integration in the final piece.
Hand-painting transparent layers to build depth and mimic skin translucency, using thin washes of pigment and glaze for realism.
Layering tones to simulate variations in skin color caused by blood vessels, capillaries, and lighting effects.
Hair, eyes, and final adornments
Depending on the project, you may add:
Short or long hair using character-appropriate fibers.
Glass or acrylic eyes for busts or portraits that require a high level of realism.
Prosthetic details, jewelry, or scars to enhance the narrative of the piece.
Sealing and preservation
To ensure longevity, you’ll typically apply a clear protective sealant compatible with the casting material. A UV-resistant topcoat helps prevent color fading, while a barrier coat can guard against humidity and physical wear. For silicone-based casts, use sealants compatible with silicone to avoid interactions that could cause cracking or tackiness.
Care, display, and longevity of body casts
Preservation considerations depend on the material and the environment in which the piece will live. Here are practical tips to maximize longevity and presentation quality.
Store in a climate-controlled environment to reduce heat and moisture exposure that can degrade materials.
Avoid direct, prolonged sunlight to prevent color fading and material degradation.
Display on a stable, protective base or mount to prevent stress on delicate joints or edges.
Periodically inspect for cracks, tears, or surface wear and address promptly with professional restoration techniques if needed.
Variation and versatility: why body casting remains relevant
Body casting is not a monolithic practice. The technique adapts to a range of contexts, from practical to poetic, technical to ceremonial. Here are some variations and applications that keep the practice relevant across disciplines.
Artist portraits: Highly detailed busts that capture personality and presence, used in galleries or private commissions.
Prosthetic references: Casting for medical devices, prosthetics, or orthotics requires precise anatomy and careful material choices to ensure comfort and function.
Animation and visual effects: Realistic body references help sculptors, animators, and VFX teams develop authentic characters and movements.
Educational and museum contexts: Detailed casts support anatomy education, anthropology, and art appreciation, offering tangible study aids.
Artistic installations: Large-scale or interactive casts become part of contemporary installations that invite viewer engagement and interpretation.
Common challenges and how to address them
Even experienced practitioners encounter obstacles. Here are some frequent issues and practical strategies to handle them.
Air bubbles and detail loss: Work slowly, particularly around recessed areas, and use multiple thin layers of impression material to capture fine detail. Tap or vibrate the filled mold gently to release trapped air.
Material sticking to skin: Ensure adequate release agent and test a small skin area first. If sticking occurs, pause and reapply a barrier before continuing.
Incomplete demolding: If the mold clings to skin, pause and reapply gentle, steady pressure while the model breathes and relaxes. For more complex areas, extra care or different release agents may be necessary.
Weight and support for full-body casts: Use padding, supports, and a safe, comfortable position. A well-structured frame helps prevent fatigue and injury.
Allergic reactions: Patch-test materials on a small skin area prior to full application, and have a plan to switch materials if irritation occurs.
Ethics, privacy, and post-project considerations
Beyond the technicalities, body casting engages deeply with people’s bodies and stories. A responsible approach includes:
Respect for privacy: Consider how the cast will be stored, displayed, or shared publicly. Anonymize or consent for identifiable details when necessary.
Consent renewal: If the work will be used in a new context, obtain refreshed consent from the subject or their legal representative.
Access and inclusion: Ensure the process respects physical ability differences, offering accommodations as needed.
Documentation: Record the process’s steps, materials used, and care instructions to support future restoration or reproduction.
Case studies: examples of body casting in practice
Real-world projects illustrate how these principles come alive. Here are brief, anonymized scenarios that highlight strategies and outcomes:
Portrait bust for a gallery: A mid-length face cast with a silicone-based final piece, featuring hand-painted skin tones and a custom mount. The process emphasized expressive detail and a calm casting session for the subject.
Medical animation reference: A series of limb casts used by a surgical team to plan complex procedures. The emphasis was on precise proportions and safe handling of materials in a clinical setting.
Museum installation: A full-body composite cast arranged as part of an anthropological exhibit, with careful documentation and contextual labeling to explain materials and techniques to visitors.
Checklist: quick reference for your first project
If you are planning your first body casting project, keep this compact guide handy:
Obtain clear consent and document the intended use of the cast.
Choose a safe impression material suitable for the body part and your environment.
Prepare a clean, comfortable workspace with adequate ventilation and lighting.
Have a reliable release agent and all safety gear on hand.
Plan for a shell to support the mold and a suitable casting material.
Document the process and store the final piece in a climate-controlled space.
Final thoughts: embracing the craft of body casting
Body casting is both a technical craft and an expressive art form. It requires careful preparation, a respect for the model, and a willingness to balance precision with creativity. Whether you are creating a highly realistic life cast for a gallery, a detailed anatomical reference for education, or a stylized piece for an installation, the core principles remain the same: secure consent, prioritize safety, capture detail with appropriate materials, and finish with care to achieve the intended look and longevity. As you gain experience, you may develop personal workflows, favorite material combinations, and a distinctive aesthetic that makes your body casting practice uniquely yours.